Starting with ROS 2 on the Robot
ROS Bringup
The user has 3 different ways to start ROS 2 on their new platform.
Autostart
In general, when switching on a new robot, there is an autostart script for ROS that will bring up all the necessary drivers, and packages for the hardware components of the robot. If the user followed the automated workspace setup instructions in Installation, then the application to start ROS would already be part of the robot’s desktop.
From the Terminal
In the case where the user has installed all the necessary ROS 2 packages manually, the user is required to open a terminal and run the following commands:
MP / MM robots
ros2 launch neo_mpo_700-2 bringup.launch.py
ROX robots
ros2 launch rox_bringup bringup.launch.py rox_type:=argo
Deskop Application
If the user has followed the automated workspace setup and disabled the autostart of the application that brings up ROS, the user can double-click on the application to start ROS and bring up all the essential ROS drivers.
Attention
Regardless of the method used, mobile manipulators typically take longer to load the drivers and reach a ready state. For MP robots, please closely monitor the LCD display and follow the on-screen instructions. For example, the MPO-700 + UR10 DC setup takes approximately 90 seconds for the drivers to start up. For ROX robots, watch the LED indicators and reset the keys once the blue lights start blinking to make the robot operational.
Connecting User PC to the platform via the middleware
A brand new robot from Neobotix, will have the following RMW pre-installed. In case of someone updating their Robot on their own, we also recommend the following combination of Distro and RMW:
| Distrbutions | Installed |
|---|---|
| Humble | Cyclone |
| Iron | Cyclone or Zenoh |
| Jazzy | Cyclone or Zenoh |
Connecting to the PC and the robot has already been discussed in Getting Started.
It is essential that both the robot PC and the client PC have the same RMW Implementation. Make sure in the ~/.bashrc both the robot PC and client PC has the rmw_implementation environment variable exported.
Note
Please contact us directly if you have any questions related to the network interfaces configured in the bashrc for the CycloneDDS.
export rmw_implementation=rmw_cyclonedds_cpp
ROS 2 in general uses the Domain ID to distinguish between groups of computers running on the same network. By default, we set all the domain IDs of our robots to 0, which is also the factory default configuration of ROS 2.
If changes are required, then the user has to add the following line to the ~/.bashrc of his client PC as well as the robot PC.
export ROS_DOMAIN_ID=1
Note
The above setting will only work for devices connected to the same network, i.e. technically having the same subnet mask for rmw_cyclonedds or rmw_fastrtps.
Configs for RMW_Zenoh
Coming soon!
Testing connection
After completing the ROS network configuration, the user PC should be able to connect to the ROS on the platform. To check the connection, the user can try to list the available topics as follows:
ros2 topic list
It should show the topics as follows:
MP / MM robots
Note
As of November 2025, The newest generation of MPO-500 has been released with the upgraded hardware and software. Please refer the next section for the list of topics related to the newest generation of the MPO-500
/cmd_vel
/diagnostics
/joint_states
/joint_states_raw
/joint_trajectory
/joint_states
/joy
/joy/set_feedback
/lidar_1/scan
/lidar_1/scan_filtered
/lidar_2/scan
/lidar_2/scan_filtered
/odom
/battery_state
/emergency_stop_state
/state
/rosout
/rosout_agg
/tf
/tf_static
ROX robots and new-gen MP robots
/battery_state
/cmd_vel
/diagnostics
/drive/joint_states
/drive/joint_trajectory
/emergency_stop_state
/ioboard/data
/joint_states
/joy
/joy/set_feedback
/kinematics_state
/lidar_1/extended_scan
/lidar_1/output_paths
/lidar_1/raw_data
/lidar_1/scan_filtered
/lidar_2/extended_scan
/lidar_2/output_paths
/lidar_2/raw_data
/lidar_2/scan_filtered
/odom
/parameter_events
/relayboard_v3/state
/robot_description
/rosout
/safety_state
/scan
/tf
/tf_static
Note
If the IMU and the robot arm is enabled, then user should be able to see few more topics published as described in the documentation of the phidget_drivers
More about bringup
The bringup component that we saw earlier is the heart of our software stack, as this starts and configures all the necessary hardware components that are part of the platform with the help of the corresponding drivers. The launch of the bringup comes with additional arguments. Brief description of the launch arguments are described below:
MP / MM robots
A detailed description of all possible launch arguments and available options can be displayed in the terminal using the following command:
ros2 launch neo_mp(?)_(?)00-2 bringup.launch.py --show-arguments
Please update the robot’s name accordingly to see the relevant arguments.
Note
- As of July 2023, the complete namespacing support is currently only avaiable for MP-400 and partially for MPO-700. The rest will be updated soon.
- Few of the arguments mentioned below are not available for all the robots. Please check the arguments using the above mentioned command before proceeding.
- Similarly few of the arguments mentioned below are now supported for ROS-Distros below Jazzy.
Attention
use_legacy argument is available only for MPO-500.
Arguments (pass arguments as '<name>:=<value>'):

'robot_namespace':
    Top-level namespace
    (default: '')

'imu_enable':
    Enable IMU - Options: True/False
    (default: 'False')

'd435_enable':
    Enable Realsense - Options: True/False
    (default: 'False')

'scanner_type':
    Type of laser scanner to use. Valid choices are: ['', 'sick_s300', 'sick_microscan3']
    (default: 'sick_s300')

'disable_scanners':
    Disable Scanner - Options: True/False
    (default: 'False')

'use_docking_adapter':
    Enable docking adapter - Options: True/False
    (default: 'False')

'arm_type':
    Arm Types
. Valid choices are: ['', 'ur5', 'ur10', 'ur5e', 'ur10e', 'ec66']
    (default: '')

'use_ur_dc':
    Set this argument to True if you have an UR arm with DC variant
    (default: 'False')

'gripper_type':
    Enables gripper and it's controllers. Valid choices are: ['', '2f_140', '2f_85', 'epick']
    (default: '')

'use_mock_arm':
    Mock arm and gripper (if available)
    (default: 'False')

'initial_controller_arm':
    Initial controller for the arm
. Valid choices are: ['', 'joint_trajectory_controller', 'scaled_joint_trajectory_controller']
    (default: 'scaled_joint_trajectory_controller')

'robot_ip':
    IP address of the robot arm.
    (default: '192.168.1.102')

'controllers_file':
    YAML file with the arm controllers configuration.
    (default: '/home/pradheep/rolling_ws/install/neo_mpo_700-2/share/neo_mpo_700-2/configs/ur/ur_controllers.yaml')

'use_legacy':
    Set legacy to True if you are using the old model
    (default: 'False')
Note
- Currently, only Universal robots are supported, soon Elite robots will be added.
- Setting up an IMU or any other customization can be seen in Customization for ROS 2.
- For UR10 AC, make sure to set the robot arm to remote mode in the teach pendant before bringing up the drivers.
- For UR10 DC, the robot arm is set to remote mode in the teach pendant during the time of delivery. Thus the teach pendant will be disconnected during the delivery.
The launch prompt for the commandline with all the option set, will be something like this:
ros2 launch neo_mpo_700-2 bringup.launch.py robot_namespace:="robot1" use_imu:=True arm_type:="ur5" gripper_type:="epick"
More about the namespacing can be learnt in the documentation for Namespacing Guide.
Frames of the UR arms are broadcasted with a prefix. The prefix is the name of the arm_type itself. For example, if the arm_type is set to ur5, then the frames will be broadcasted as ur5base_link, ur5shoulder_link, ur5elbow_link, ur5wrist_1_link, ur5wrist_2_link, ur5wrist_3_link and ur5tool0.
For launching with the Mock Hardware:
Note
When using mock hardware, only manipulation can be performed. Navigation is not supported in this mode. Please read the subsection manipulation for more info.
ros2 launch neo_mpo_700-2 bringup.launch.py arm_type:=ur10e gripper_type:=2f_140 robot_ip:=yyy.yyy.yyy.yyy use_mock_arm:=True
ROX robots
If the user decides to modify relayboard_v3 configs for the ROX platforms, it is always essential to turn the key towards the “on” direction, once after the ROS bringup as been initiated. The indications can be seen with the LED’s if they are present. The robot will not move without the key being turned.
Note
For more information regarding the LED colors, please take a look at the table given here.
Arguments (pass arguments as '<name>:=<value>'):

'robot_namespace':
    Top-level namespace
    (default: '')

'rox_type':
    Robot type
. Valid choices are: ['', 'argo', 'argo-trio', 'diff', 'trike']
    (default: 'argo')

'arm_type':
    Arm used in the robot - currently only Universal Robotics arms are supported
. Valid choices are: ['', 'ur5', 'ur10', 'ur5e', 'ur10e']
    (default: '')

'scanner_type':
    Scanner options available: nanoscan/psenscan
    (default: 'nanoscan')

'imu_enable':
    Enable IMU - Options: True/False
    (default: 'False')

'use_ur_dc':
    Set this argument to True if you have an UR arm with DC variant
    (default: 'False')

'use_mock_arm':
    Mock arm and gripper (if available)
    (default: 'False')

'robot_ip':
    IP address of the robot arm.
    (default: '192.168.1.102')

'controllers_file':
    YAML file with the arm controllers configuration.
    (default: '/home/user/ros2_rolling_ws/install/neo_mpo_700-2/share/neo_mpo_700-2/configs/ur/ur_controllers.yaml')

'gripper_type':
    Enables gripper and it's controllers. Valid choices are: ['', '2f_140', '2f_85', 'epick']
    (default: '')
Note
- Currently, only Universal robots are supported, soon Elite robots will be added.
- Make sure to set the robot arm to remote mode and starting the necessary .urp in the teach pendant before bringing up the drivers.
The launch prompt for the commandline with all the option set, will be something like this:
ros2 launch rox_bringup bringup_launch.py rox_type:=argo-trio arm_type:=ur10 robot_ip:=192.168.1.102 gripper_type:=2f_140 imu_enable:=True
Frames of the UR arms are broadcasted with a prefix. The prefix is the name of the arm_type itself. For example, if the arm_type is set to ur5, then the frames will be broadcasted as ur5ebase_link, ur5eshoulder_link, ur5eelbow_link, ur5ewrist_1_link, ur5ewrist_2_link, ur5ewrist_3_link and ur5etool0.
For launching with the Mock Hardware:
ros2 launch rox_bringup bringup_launch.py rox_type:=argo arm_type:=ur10e gripper_type:=2f_140 robot_ip:=yyy.yyy.yyy.yyy use_mock_arm:=True
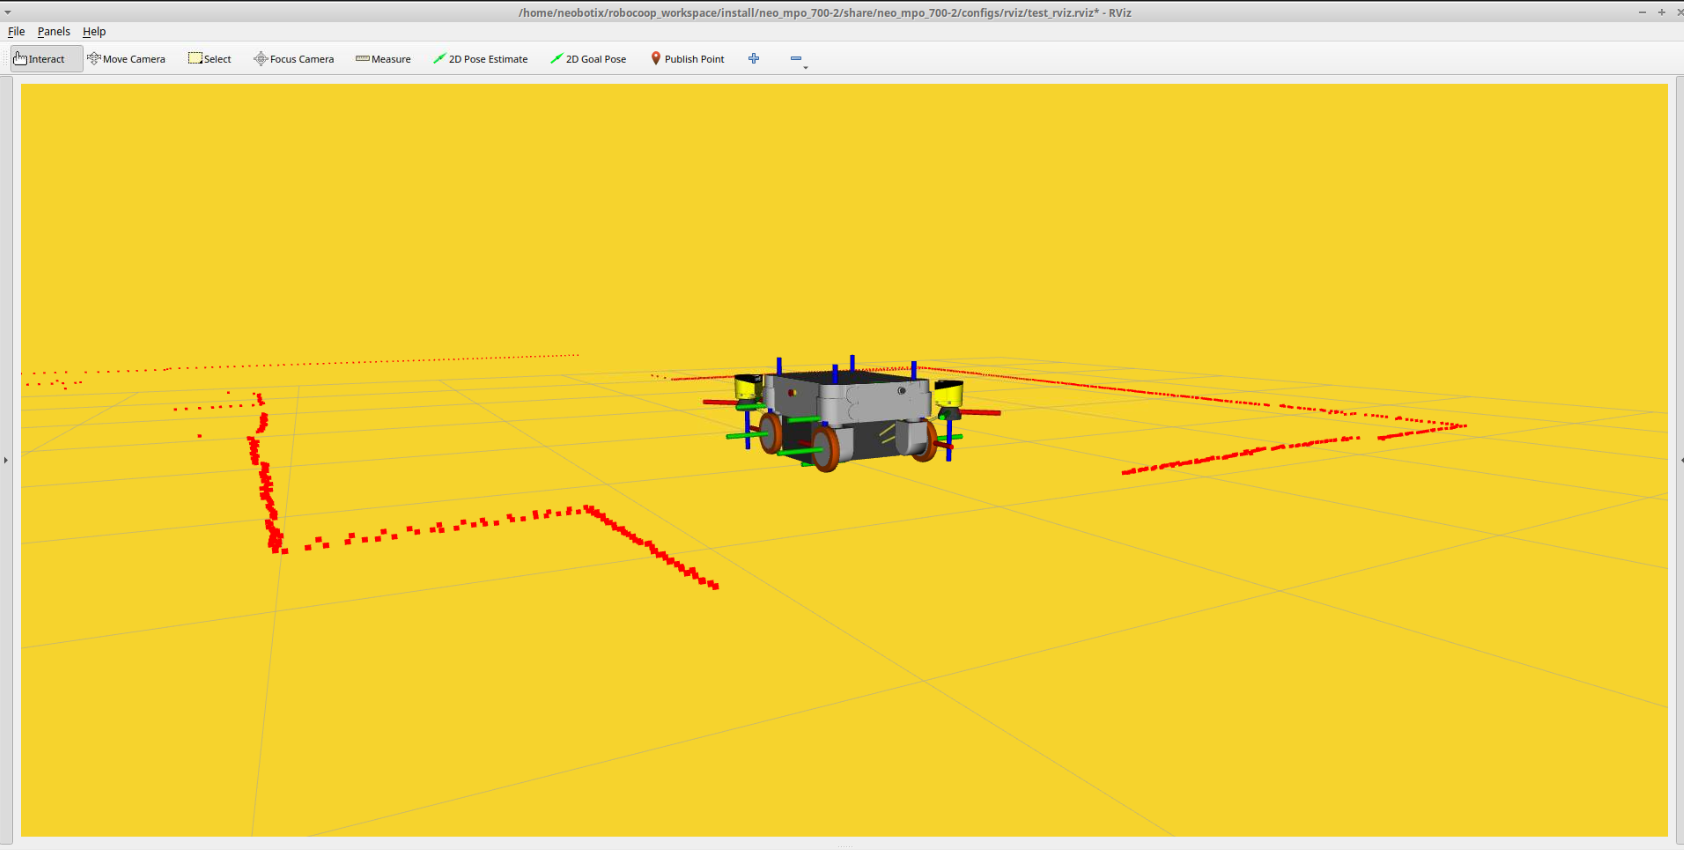
Visualize the data with RViz
A pre-configured visualization can be started via a launch file from users’ Client-PC as follows:
MP / MM robots
RViz launch found for each of the MP series robots depends on the package mp_rviz. The launch arguments that they provide are as follows
Arguments (pass arguments as '<name>:=<value>'):

'use_sim_time':
    Use simulation clock if True (True/False)
    (default: 'False')

'use_joint_state_publisher_gui':
    Use joint state publisher gui if True (True/False)
    (default: 'True')

'arm_type':
    Arm Types. Valid choices are: ['', 'ur5', 'ur10', 'ur5e', 'ur10e', 'ec66']
    (default: '')

'use_imu':
    Enable IMU sensors if true
    (default: 'False')

'use_d435':
    Enable Intel RealSense D435 camera if true
    (default: 'False')

'scanner_type':
    Type of laser scanner to use
. Valid choices are: ['sick_s300', 'sick_microscan3']
    (default: 'sick_s300')

'gripper_type':
    Gripper Types. Valid choices are: ['', '2f_140', '2f_85', 'epick']
    (default: '')

'use_docking_adapter':
    Enable docking adapter if true
    (default: 'False')

'display_mode':
    Disable robot and joint state publishers if true (True/False)
    (default: 'True')

'use_ur_dc':
    Set this argument to True if you have an UR arm with DC variant
    (default: 'False')

'rviz_config':
    Full path to an RViz config file
    (default: '/home/pradheep/jazzy_ws/install/neo_mpo_700-2/share/neo_mpo_700-2/configs/rviz/robot_description_rviz.rviz')
Note
The argument display_mode can be set to False for just visualizing the robot, when there are no drivers activated.
ros2 launch neo_mp_400-2 rviz.launch.py
ros2 launch neo_mp_500-2 rviz.launch.py
ros2 launch neo_mpo_500-2 rviz.launch.py
ros2 launch neo_mpo_700-2 rviz.launch.py
ROX robots
ros2 launch rox_rviz rox_rviz_launch.py
Teleoperation
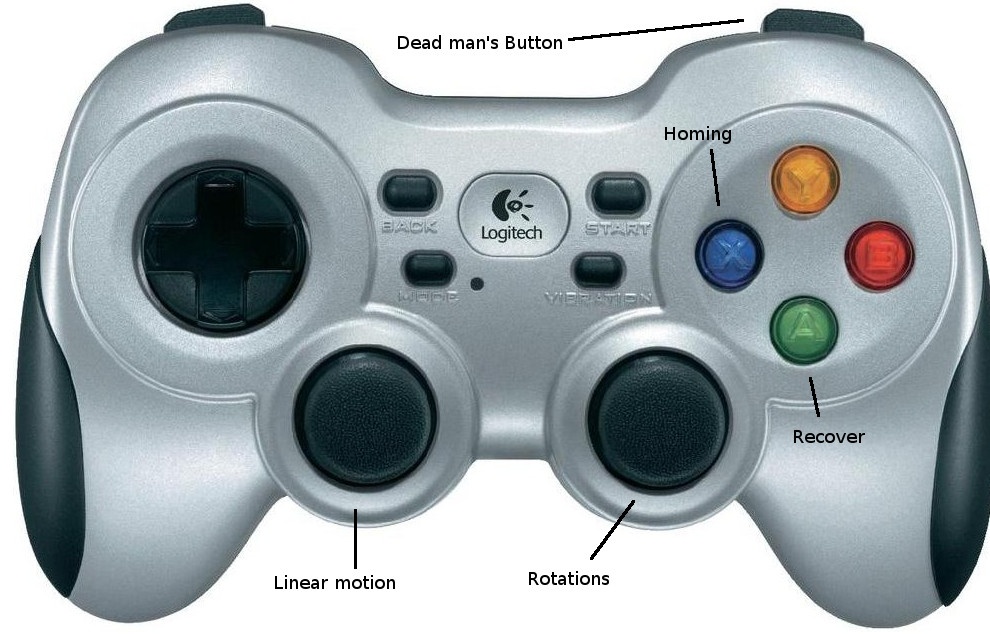
Joystick node is already initialized in the bringup. The Logitech joystick should be operable at this point.
User can use the left stick for navigating the robot in X and Y direction and the right stick for rotating the robot in-place.
Please make sure to set the joystick to D-mode (found on the top of the Joystick) before teleop.
Warning
It is always essential to manually move the axes of the joystick in all possible directions, before pressing the deadman button and starting the teleoperation of the robot. Please read this issue about the teleop for more information. This warning can be ignored if the ros2 workspace has the updated joystick drivers maintained and distributed by Neobotix.
Note
The differential robots MP-400 and MP-500 cannot move in Y direction.
The default speeds of the joystick can be tuned under the config folder for both ROX(rox/rox_bringup/configs/teleop) and the MP robots(mp_robot/configs/teleop).
Charging with Wallbox
The wireless charging feature of the ROX is taken care by the neo_relayboard_v3
Attention
Please configure the necessary parameters mentioned in the neo_relayboard_v3 to configure the battery setup and the charging process in
/home/neobotix/ros2_workspace/src/rox/rox_bringup/configs/neo_relayboard_v3/relayboard_v3.yaml.
Note
For different docking methods please refer to neo_docking2 - Contour Matching Based Docking and neo_docking2 - teaching based docking.
To start and stop the charging, please use the following commands:
ros2 service call /start_charging std_srvs/srv/Empty {}
ros2 service call /stop_charging std_srvs/srv/Empty {}
Manipulation
The platforms that are equipped with an arm can be quickly tested using the rqt_joint_trajectory_controller plugin. The plugin can be started as follows:
Attention
By default, scaled_joint_trajectory_controller is used for the Universal robots. Therefore rqt_joint_trajectory_controller will not be able to send the commands for the same. Switch the initial controller to the joint_trajectory_controller using the argument discussed in the bringup section.
ros2 run rqt_joint_trajectory_controller rqt_joint_trajectory_controller
More information regarding the joint_trajectory_controller can be found here.
Attention
The robot arm can be also controlled with the MoveIt. Please read the neo_ur_moveit_config for the MP robots for more information. Please read the neo_rox_moveit2 for the ROX series robots for more information.
The E-series version of the UR arm comes with dashboard commands, allowing for remote control of the arm. This includes functions such as turning on the robot, releasing the brake, starting and stopping programs, and more. A list of ROS 2-based dashboard services available can be found at the following link:
Dashboard Client Documentation.
Note that for this to work, the teach pendant must always be in remote mode. For more information on how the teach pendant works, refer to the user manual.
Please use the nbx_config.urp / neobotix.urp program, which contains the necessary configurations and URCaps to communicate with the ROS drivers.
Gripping
Attention
The gripping packages for the hardware has been only tested in Humble Distro. More information about support for recent ROS distributions will be available soon.
Currently, we support 2 different variants of the robotiq gripper, namely:
- 2f-140, 2f-85 Package for 2f grippers
- Epick Package for epick gripper
Attention
Please read the README of the gripper repository to know in detail about the software interface of the gripper.
Note
Make sure the right gripper have been selected during the bringup launch.
Attention
Epick gripper simulation is only for simulation
The gripper is connected directly connected to the computers on-board PC through serial communication.
The drivers of the corresponding grippers are loaded during the bringup stage, as shown in the instructions above.
Grabbing and releasing an object using the vaccum based Epick gripper is straight forward. The hardware interface exposes a command interface labeled grip_cmd for gripping and releasing operations.
For gripping:
ros2 service call /grip_cmd std_srvs/srv/SetBool data: True
For releasing:
ros2 service call /grip_cmd std_srvs/srv/SetBool data: False
For the case of 2f grippers, the easiest way to control them would be to use the available ROS 2 action interfaces:
For real and mock gripper:
ros2 action send_goal /robotiq_gripper/robotiq_gripper_controller/gripper_cmd control_msgs/action/GripperCommand “{command: {position: 0.2, max_effort: 5.0}}
For simulation:
ros2 action send_goal /robotiq_2f_140_gripper_controller/gripper_cmd control_msgs/action/GripperCommand "{command: {position: 0.5, max_effort: 30.0}}"
More about the gripper controller can be read in ros2 documentation about the gripper controller